
Are you eager to run Ubuntu alongside your Windows 10 system? With the Windows Subsystem for Linux (WSL) 2, you can easily achieve that, for more details WSL 2 was introduced in Windows 10 version 2004. This guide will walk you through the steps to install either Ubuntu 20.04 or 22.04 in WSL 2 on your Windows 10 machine.
Before you start, ensure you have the following:
- A Windows 10 machine with version 2004 or later.
- A Microsoft account with admin privileges.
- Windows Subsystem for Linux (WSL) feature enabled on your Windows 10 machine.
- Open PowerShell with administrative privileges.
These are the step-by-step process what you need to do:
- Check your Windows version and build number.
- Verify administrator privileges.
- Enable the Windows Machine Platform feature.
- Enable the Windows Subsystem for Linux (WSL) feature.
- Install Ubuntu 20.04 or 22.04 in WSL 2.
- Optional: Install Ubuntu in WSL 2 via PowerShell.
- Configure Ubuntu user account and password.
Step 1: Check your Windows version and build number
Firstly, you need to check your Windows version and build number to ensure compatibility with the Windows Subsystem for Linux (WSL) feature. Follow these steps:
- Open PowerShell with administrative privileges.
- Type the following command and press Enter:
systeminfo | findstr /B /C:"OS Name" /C:"OS Version"
- Look for the output that includes your “OS Name” and “OS Version.”
- For compatibility with WSL 2, your Windows version should be 2004 or later, and the build number should be 19041 or later.
- Ensure that the output includes the Windows version and build number that meets or exceeds these requirements.
If your Windows version and build number meet these criteria, then your system is compatible with Windows Subsystem for Linux (WSL) 2. If not, you may need to update your Windows operating system to a compatible version.
Step 2: Verify administrator privileges
To determine if your user account has administrative privileges using the whoami /groups command in Windows, look for the presence of the “Administrators” group in the output. Here’s how to do it:
- Open PowerShell with administrative privileges.
- Type the following command and press Enter:
whoami /groups
- Look for the “S-1-5-32-544” entry in the output.
- If you see “S-1-5-32-544” listed, it means your user account belongs to the “Administrators” group, indicating administrative privileges.
- If you don’t see “S-1-5-32-544” listed, it means your user account does not have administrative privileges.
If your user does not have administrator privileges, log in as an administrator or ask an administrator to elevate your privileges.
Step 3: Enable Windows features
Enable the required Windows features for WSL 2:
- Open PowerShell with administrative privileges.
- Run the following command:
dism.exe /online /enable-feature /featurename:Microsoft-Windows-Subsystem-Linux /all /norestart
The command above typically enables the Windows Subsystem for Linux (WSL) feature without requiring a restart. However, there can be cases where a restart is necessary for the changes to fully take effect, depending on your system configuration or settings. So, much better to restart your machine 😎.
Step 4: Enable WSL feature
To determine if WSL 2 is enabled on your machine using both PowerShell and the DISM command, follow these steps:
- Open PowerShell with administrative privileges.
- Enter the following command and press Enter:
Get-WindowsOptionalFeature -Online | Where-Object {$_.FeatureName -eq "VirtualMachinePlatform"}- If WSL 2 is enabled, you’ll see output similar to:
FeatureName : VirtualMachinePlatform
State : Enabled- Additionally, you can use the DISM command to check:
dism.exe /online /get-features | Where-Object { $_ -match "Microsoft-Windows-Subsystem-Linux" }Output:
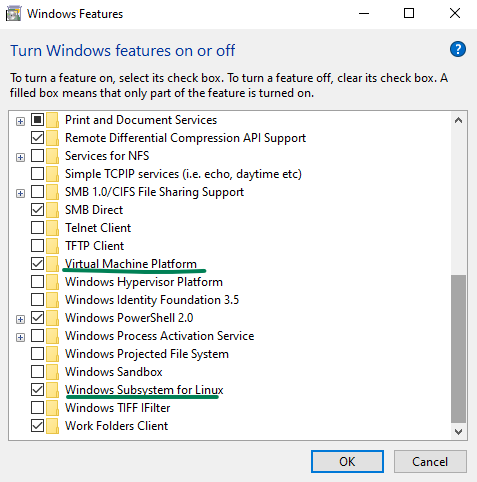
Feature Name : Microsoft-Windows-Subsystem-LinuxOtherwise, you can go to ‘Turn Windows features on or off‘ in your Windows settings to verify if the Windows Subsystem for Linux is enabled.
Step 5: Install Ubuntu in WSL 2
Once the WSL feature is enabled, you can install Ubuntu from the Microsoft Store or using the wsl command. Here’s how:
- Open the Microsoft Store and search for “Ubuntu 20.04” or “Ubuntu 22.04”.
- Click on the desired app and click the “Get” button to download and install it.
- After installation, launch Ubuntu from the Start menu.

Step 6: Optional – Installing Ubuntu in WSL 2 via PowerShell
Alternatively, you can install Ubuntu in WSL 2 using PowerShell commands:
- List the available WSL distributions:
wsl --list --online
- Install Ubuntu:
wsl --install -d Ubuntu-20.04
- Set WSL 2 as the default version:
wsl --set-default-version 2
- Check the installed distributions:
wsl -l -v
- Verify the Ubuntu version:
lsb_release -a
Final Step: Configure Ubuntu user account and password
Upon installation, follow the prompts to create a user account and password for Ubuntu.
Creating new user account...
username:
After following these steps, you’ll have Ubuntu 20.04 or 22.04 installed in WSL 2 on your Windows 10 machine. Enjoy the seamless integration of Linux with your Windows environment!
Welcome to Ubuntu 20.04 LTS (GNU/Linux 4.19.104-microsoft-standard x86_64)

 * Documentation:  https://help.ubuntu.com
 * Management:     https://landscape.canonical.com
 * Support:        https://ubuntu.com/advantage

0 packages can be updated.
0 updates are security updates.


The programs included with the Ubuntu system are free software;
the exact distribution terms for each program are described in the
individual files in /usr/share/doc/*/copyright.

Ubuntu comes with ABSOLUTELY NO WARRANTY, to the extent permitted by
applicable law.

username@Ubuntu:~$
For troubleshooting Windows Subsystem for Linux, refer to Microsoft’s official documentation.